Running netlab on a Linux Server
This page describes generic installation steps for creating a virtual lab environment on any Linux distribution (follow these instructions if you plan to run your labs on a Debian or Ubuntu server, including Windows Subsystem for Linux).
Warning
We test netlab on Ubuntu to provide a reasonably hassle-free experience for networking engineers without Linux sysadmin skills. Unfortunately, we cannot help you if you run netlab on another Linux distribution (dealing with one distro is more than enough pain). Still, please try to make it work; we would appreciate it if you could add your findings to this document. Thank you!
Prerequisite Software Installation
netlab is a Python package that uses Docker or Podman to run containers and libvirt with KVM to run virtual machines. Virtual machines in the KVM environment and the associated Linux bridges are created with Vagrant using the libvirt API. netlab uses shell scripts, Netmiko, or Ansible to configure network devices.
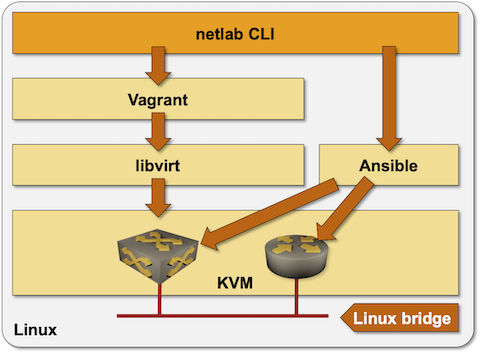
To build a Linux environment needed to run network devices as virtual machines or containers:
Install Python 3.10 or later (use the latest Python version supported by your Linux distribution)
If you want to run network devices as virtual machines with KVM:
Install KVM and libvirt
Install Vagrant 2.4.9 or later[1]
Install vagrant-libvirt plugin with
vagrant plugin install libvirt --plugin-version=0.12.2
If you want to run network devices as containers (or virtual machines in vrnetlab containers), install Docker and containerlab.
Tip
If possible, use containerlab and package the virtual machines you need in vrnetlab containers. Getting Vagrant to work on some Linux distributions can be a bit challenging.
Finally, install Ansible 2.9.1 or later and any Ansible networking dependencies (example: paramiko). We recommend using the latest Ansible 11.x release. You might be able to use the netlab install ansible command (after installing netlab) instead of manual installation.
netlab also needs (at least) these Linux commands to provide its full functionality:
ssh to connect to the virtual machines.
sshpass to pass admin passwords to ssh (we’re not brave enough to believe SSH keys work on all network devices).
ansible-playbook to configure network devices
kvm-ok to test if KVM works on the server[2] (but see also Changing Installation Checks)
virsh to create libvirt networks
ip to create network interfaces and turn them on or off
brctl to manage Linux bridges
sysctl to change system settings
qemu-img to get virtual disk information while building Vagrant boxes
To see the Linux commands executed by various netlab commands, use the --dry-run option of netlab up, netlab down, or netlab connect.
netlab Installation
Install the Python package with sudo python3 -m pip install networklab or your preferred Python package installation procedure.
Tip
Installing Python packages as root is not recommended. If you’re not setting up a throwaway VM/server, please use your regular Python package installation process.
Creating vagrant-libvirt Virtual Network
Always start your labs with the netlab up command; it automatically creates the vagrant-libvirt virtual network with correct static DHCP bindings before calling vagrant up. Recent versions of the vagrant-libvirt plugin remove the vagrant-libvirt virtual network on vagrant destroy (called by netlab down); creating that network manually makes no sense.
Testing the Installation
The easiest way to test your installation is to use the netlab test command. If you prefer to do step-by-step tests, you might find this recipe helpful:
Create an empty directory and a
topology.ymlfile with the following contents within that directory:
---
defaults:
  device: frr

module: [ ospf ]

nodes: [ s1, s2, s3 ]
links: [ s1-s2, s2-s3, s1-s2-s3 ]
Start the lab with
netlab upto test libvirt installation ornetlab up -p clabto test containerlab installationConnect to the FRR devices with the
netlab connectcommandDestroy the lab with
netlab down
Host Networking Caveats
netlab relies on standard Linux bridges to implement multi-access links. If you encounter a situation where Layer-2 traffic passes through the bridge but there’s no Layer-3 connectivity, you’re probably fighting with a too-aggressive firewall.
The easiest workaround is to turn off your distribution’s firewall and reboot. In NixOS, the operating system where this problem was first encountered, you can follow this recipe:
Open your global
configuration.nixfile in the editor of your choiceAdd the configuration option
networking.firewall.enable = false;Save the fileExecute
nixos-rebuild switchcommand to reach the new desired configuration stateReboot into the new configuration