Ubuntu VM Installation
The easiest way to set up your lab environment on your laptop or in your virtualized compute infrastructure is to create an Ubuntu virtual machine (use the WSL virtual machine on Windows) and run the netlab install command inside it to install the required software packages. You could also run netlab on a Ubuntu instance in a public cloud.
Warning
Running libvirt within an Ubuntu VM requires nested virtualization. You don’t need nested virtualization to run Docker containers within an Ubuntu VM.
The easiest way to run an Ubuntu VM on Windows is to use Windows Subsystem for Linux.
On other platforms, Canonical Multipass is probably the easiest way to start an Ubuntu VM on your laptop if you don’t need nested virtualization. Create an instance with as much RAM and as many CPU cores as you can afford, and install the necessary software on it.
You can also use Vagrant or create the virtual machine yourself (for example, using the VMware GUI).
Running netlab on Windows Subsystem for Linux
Follow Microsoft’s documentation to install Windows Subsystem for Linux.
Ensure you have WSL version 2.7.10.0 (or later) and use the latest Ubuntu or Debian image.
Add the following lines to the
/etc/wsl.conffile:
[boot]
systemd=true
Follow the netlab on Ubuntu VM installation instructions
Creating Ubuntu VM with Vagrant
You can use Vagrant to set up an Ubuntu VM on your computer. Vagrant will automatically:
Download the required virtual disk image
Start the virtual machine
Enable SSH access to the virtual machine
Provision the software on the virtual machine
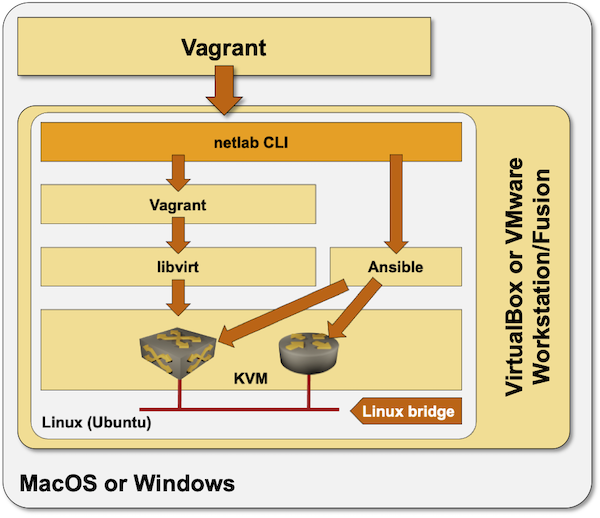
Installation steps (assuming you’re using VMware Fusion):
Install VMware Fusion/Workstation
Install Vagrant
Install Vagrant VMware provider if you’re using VMware Workstation/Fusion.
Create an empty directory. In that directory, create a Vagrantfile with the following content[1]. Change the memory/memsize or cpus/numvcpus settings to fit your hardware.
Vagrant.configure("2") do |config|
  config.vm.box = "bento/ubuntu-24.04"

  config.vm.provider "vmware_fusion" do |v|
    v.vmx["memsize"] = 8192
    v.vmx["numvcpus"] = "4"
    v.vmx["vhv.enable"] = "TRUE"
  end

  config.vm.provider "vmware_desktop" do |v|
    v.vmx["memsize"] = 8192
    v.vmx["numvcpus"] = "4"
    v.vmx["vhv.enable"] = "TRUE"
  end

  config.vm.provider "libvirt" do |lv|
    lv.memory = "8192"
    lv.cpus = 4
    lv.nested = true
  end

  config.vm.provision "shell", privileged: false, inline: <<-SHELL
    sudo apt-get update
    sudo apt-get install -y python3-pip
    sudo pip3 install --ignore-installed --break-system-packages networklab
    netlab install -y ubuntu ansible libvirt containerlab
  SHELL
end
Tip
The above Vagrantfile installs Python packages as root. That differs from the recommended best practice and is used primarily because we’re setting up a single-purpose VM.
Remove the pip3 and netlab commands from the Vagrantfile and follow these steps if you want to install netlab in a Python virtual environment
Execute vagrant up and wait for the installation to complete. If you’re using VMware Workstation or Fusion, specify the –provider argument in the vagrant up command when creating the VM (but not on subsequent starts).
Log into the virtual machine with vagrant ssh and test the installation with netlab test
Manual Virtual Machine Provisioning
Create an Ubuntu 22.04 or Ubuntu 24.04 virtual machine within your virtualization environment (you’ll find plenty of online tutorials). If needed, enable nested virtualization.
Log into the virtual machine
Execute these commands to download Python3 and install netlab, Ansible, vagrant, libvirt, KVM, containerlab, and Docker, or follow these steps if you want to install netlab in a Python virtual environment
sudo apt-get update
sudo apt-get install -y python3-pip
sudo pip3 install --ignore-installed networklab
netlab install -y ubuntu ansible libvirt containerlab
Tip
Installing Python packages as root is not the recommended best practice. We’re using this approach because we’re setting up a single-purpose VM.
Ubuntu 24.04 and later want you to install Python packages in a virtual environment. To stop the complaints, add the
--break-system-packagesoption to the pip3 install command.Running multiple installation scripts with netlab install might fail on some Ubuntu distributions. If you experience that problem, execute multiple netlab install commands (one per installation script).
After completing the software installation, log out, log back in (to get new group memberships), and test your installation with the netlab test command. If those tests fail, you might have to use sudo usermod to add your user to the libvirt and docker groups.